py
Layout Management
Geometry managers allow you to specify the positions of widgets inside a top-level or parent window.
Tkinter Pack
Summary: in this tutorial, you’ll learn about the Tkinter pack geometry manager and how to use it to arrange widgets on a window.
- Use the Tkinter pack geometry manager to arrange widgets in one direction, either horizontally or vertically.
- Use the
side,expand, andfill,padx,pady,ipadx, andipadyoptions of the pack geometry manager to control the layout of the widgets.
Introduction to the Tkinter pack geometry manager
Tkinter uses the geometry manager to arrange widgets on a window or frame. Tkinter supports three geometry managers:
- pack
- grid
- place
You use the pack geometry manager to arrange widgets in one direction, either vertically or horizontally.
The pack geometry manager has many options:
- Side
- Expand
- Fill
- ipadx, ipady
- padx, pady
- Anchor
Before diving into each option, you need to understand the x and y coordinates of the window:
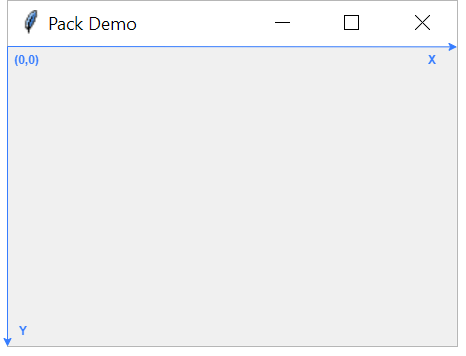
The top left corner of the window is the origin with the coordinate (0,0). The x-coordinate increments from left to right, and the y-coordinate increments from top to bottom.
Tkinter pack parameters
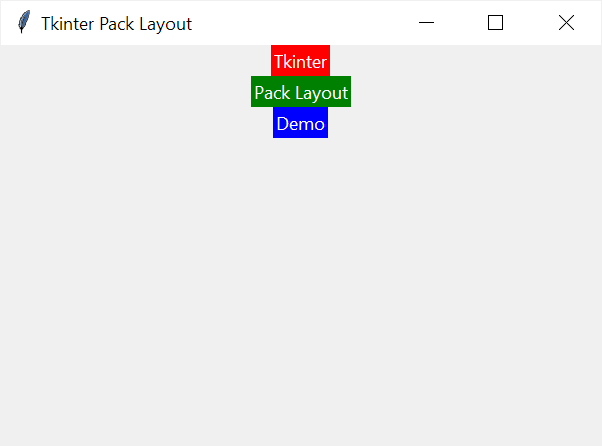
We’ll create a simple program to illustrate how the pack geometry manager works:
import tkinter as tk

root = tk.Tk()
root.title('Tkinter Pack Layout')
root.geometry('600x400')

label1 = tk.Label(root, text='Tkinter',bg='red',fg='white')
label2 = tk.Label(root,text='Pack Layout',bg='green', fg='white')
label3 = tk.Label(root, text='Demo',bg='blue', fg='white')

label1.pack()
label2.pack()
label3.pack()

root.mainloop()`Code language: JavaScript (javascript)
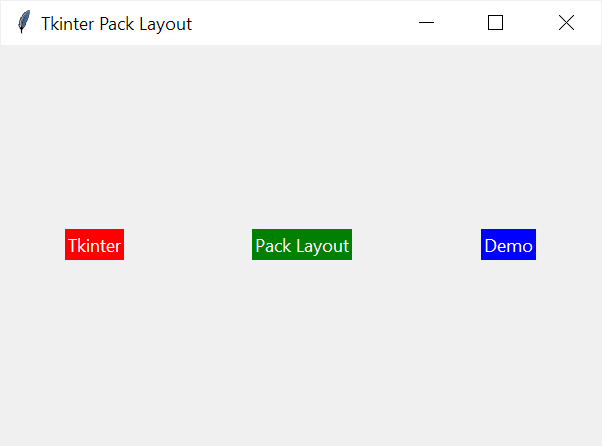
The program has a main window with three Label widgets with red, green, and blue background colors.
To use the pack geometry manager, you call the pack() method of the widget. By default, the pack geometry manager places widgets in one direction vertically from top to bottom.
Side
The side parameter determines the direction of the widgets in the layout. The side parameter has four options:
'top': arrange widgets from top to bottom vertically.'bottom': arrange widgets from bottom to top vertically.'left': arrange widgets from left to right horizontally.'right': arrange widgets from right to left horizontally.
The side defaults to 'top', arranging the widget vertically from top to bottom.
In addition to the string constants, you can use the predefined constants provided by the Tkinter module:
tk.TOPtk.BOTTOMtk.LEFTtk.RIGHT
Note that tk is the alias of the Tkinter module.
The following program explicitly sets the side to 'top' that arranges the labels vertically from top to bottom:
import tkinter as tk

root = tk.Tk()
root.title('Tkinter Pack Layout')
root.geometry('600x400')

label1 = tk.Label(root, text='Tkinter',bg='red',fg='white')
label2 = tk.Label(root,text='Pack Layout',bg='green', fg='white')
label3 = tk.Label(root, text='Demo',bg='blue', fg='white')

label1.pack(side=tk.TOP)
label2.pack(side=tk.TOP)
label3.pack(side=tk.TOP)

root.mainloop()`Code language: JavaScript (javascript)
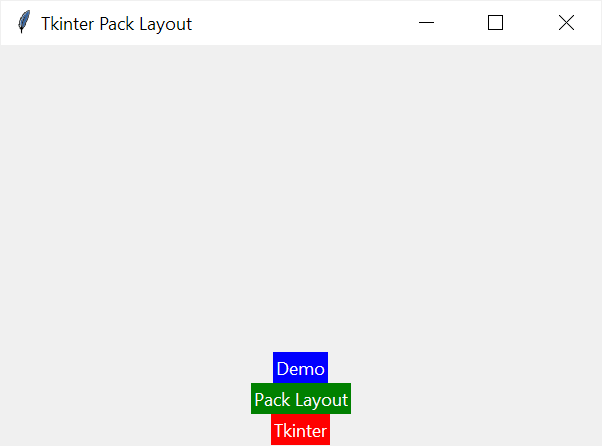
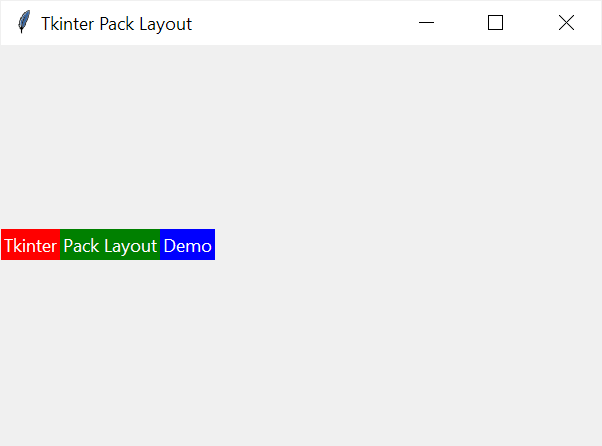
When you change the side to tk.BOTTOM, the pack arranges the labels from bottom to top vertically:
import tkinter as tk

root = tk.Tk()
root.title('Tkinter Pack Layout')
root.geometry('600x400')

label1 = tk.Label(root, text='Tkinter',bg='red',fg='white')
label2 = tk.Label(root,text='Pack Layout',bg='green', fg='white')
label3 = tk.Label(root, text='Demo',bg='blue', fg='white')

label1.pack(side=tk.BOTTOM)
label2.pack(side=tk.BOTTOM)
label3.pack(side=tk.BOTTOM)

root.mainloop()`Code language: JavaScript (javascript)
Output:
The side tk.LEFT arranges the labels from left to right:
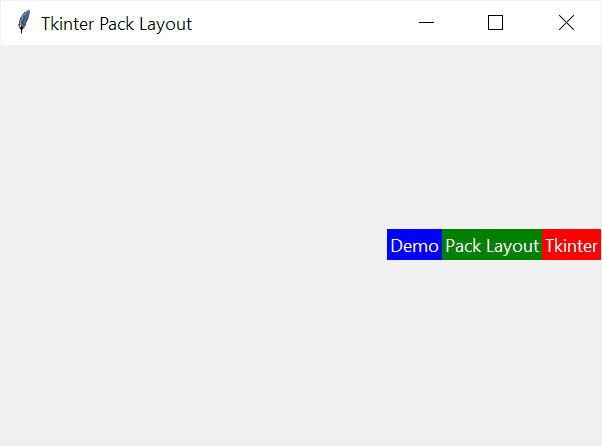
The side tk.RIGHT arranges the labels from right to left:
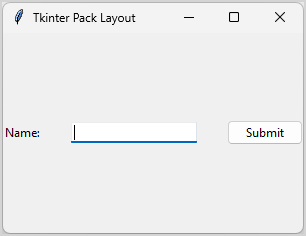
The following program shows how to use the pack to create a simple form that includes a label, an entry, and a button:
import tkinter as tk
from tkinter import ttk

root = tk.Tk()
root.title('Tkinter Pack Layout')
root.geometry('300x200')

name_label = ttk.Label(root, text="Name:")
name_label.pack(side=tk.LEFT)

name_entry = ttk.Entry(root)
name_entry.pack(side=tk.LEFT)

button = ttk.Button(root, text="Submit")
button.pack(side=tk.LEFT)

root.mainloop()`Code language: JavaScript (javascript)
Output:
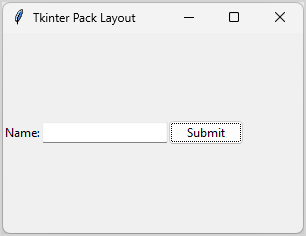
In this example, we arrange three widgets horizontally from left to right.
Widget spaces
In Tkinter, there are two kinds of spaces:
- The space a widget can occupy
- The space a widget will occupy.
By default, a widget takes only the necessary space to display its content. However, it can occupy more space.
For example, a Label widget will be only as big as the text. The background color shows that each label has a different width because the length of its text is different.
Expand
The expand determines whether the widget should expand to occupy any extra spaces allocated to the container.
If the expand is set to True, the widget will expand. If it is set to False, the widget will take only the necessary space. The expand parameter defaults to False.
The expand parameter is dependent on the side parameter.
The following table illustrates the dependencies between the side and the expand parameters when it comes to the space of the widget.
| Side | Expand |
|---|---|
| Top (or Bottom) | The widget can be as wide as the container, the expand will determine the height of the widget. |
| Left (or Right) | The widget can be as high as the container, the expand will determine the width of the widget. |
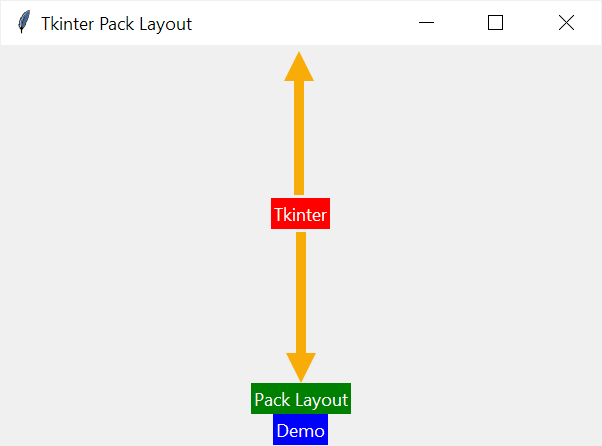
The following program places the Label widgets vertically from top to bottom and sets the expand parameter of the first Label widget to True and the other two Label widgets to False:
import tkinter as tk

root = tk.Tk()
root.title('Tkinter Pack Layout')
root.geometry('600x400')

label1 = tk.Label(root, text='Tkinter',bg='red',fg='white')
label2 = tk.Label(root,text='Pack Layout',bg='green', fg='white')
label3 = tk.Label(root, text='Demo',bg='blue', fg='white')

label1.pack(side=tk.TOP, expand=True)
label2.pack(side=tk.TOP, expand=False)
label3.pack(side=tk.TOP, expand=False)

root.mainloop()`Code language: PHP (php)
Since we set the expand parameter of the first Label to True, it occupies the entirely vertical space and pushes the other two Label widgets down to the bottom:
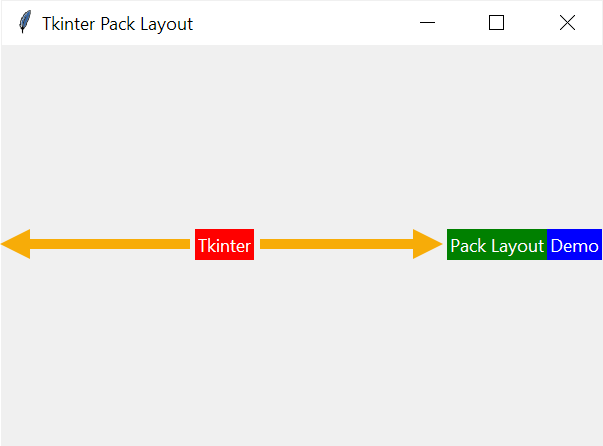
The following program places the Label widgets horizontally from left to right and sets the expand parameter of the first Label widget to True and the other two Label widgets to False:
import tkinter as tk

root = tk.Tk()
root.title('Tkinter Pack Layout')
root.geometry('600x400')

label1 = tk.Label(root, text='Tkinter',bg='red',fg='white')
label2 = tk.Label(root, text='Pack Layout',bg='green', fg='white')
label3 = tk.Label(root, text='Demo',bg='blue', fg='white')

label1.pack(side=tk.LEFT, expand=True)
label2.pack(side=tk.LEFT, expand=False)
label3.pack(side=tk.LEFT, expand=False)

root.mainloop()`Code language: PHP (php)
Since we set the expand parameter of the first Label to True, it occupies the entirely horizontal space and pushes the other two Label widgets to the right:
If you set the expand parameter of the three Label widgets to True, they will take up even horizontal spaces:
import tkinter as tk

root = tk.Tk()
root.title('Tkinter Pack Layout')
root.geometry('600x400')

label1 = tk.Label(root, text='Tkinter',bg='red',fg='white')
label2 = tk.Label(root,text='Pack Layout',bg='green', fg='white')
label3 = tk.Label(root, text='Demo',bg='blue', fg='white')

label1.pack(side=tk.LEFT, expand=True)
label2.pack(side=tk.LEFT, expand=True)
label3.pack(side=tk.LEFT, expand=True)

root.mainloop()` Code language: PHP (php)
Output:
The following program illustrates how to use the expand option to expand the Entry widget:
import tkinter as tk
from tkinter import ttk

root = tk.Tk()
root.title('Tkinter Pack Layout')
root.geometry('300x200')

name_label = ttk.Label(root, text="Name:")
name_label.pack(side=tk.LEFT)

name_entry = ttk.Entry(root)
name_entry.pack(side=tk.LEFT, expand=True)

button = ttk.Button(root, text="Submit")
button.pack(side=tk.LEFT)

root.mainloop()`Code language: JavaScript (javascript)
Output:
Fill
The fill determines if a widget will occupy the available space. It accepts the following values: ‘x’, ‘y’, ‘both’, and ‘none’. By default, the fill is ‘none’.
| fill | Effect |
|---|---|
| ‘none’ | The widget will not expand to fill any extra space. It only takes up space that fits the content. |
| ‘x’ | The widget will expand horizontally to fill any extra space along the x-axis. |
| ‘y’ | The widget will expand vertically to fill any extra space along the y-axis. |
| ‘both’ | The widget will expand both horizontally and vertically to fill any extra space in both directions. |
The following program illustrates how the fill parameter works:
import tkinter as tk

root = tk.Tk()
root.title('Tkinter Pack Layout')
root.geometry('600x400')

label1 = tk.Label(root, text='Tkinter',bg='red',fg='white')
label2 = tk.Label(root,text='Pack Layout',bg='green', fg='white')
label3 = tk.Label(root, text='Fill',bg='blue', fg='white')
label4 = tk.Label(root, text='Demo',bg='purple', fg='white')

label1.pack(side=tk.TOP, expand=True, fill=tk.X)
label2.pack(side=tk.TOP, expand=True, fill=tk.Y)
label3.pack(side=tk.TOP, expand=True, fill=tk.NONE)
label4.pack(side=tk.TOP, expand=True, fill=tk.BOTH)

root.mainloop()`Code language: PHP (php)
Output:
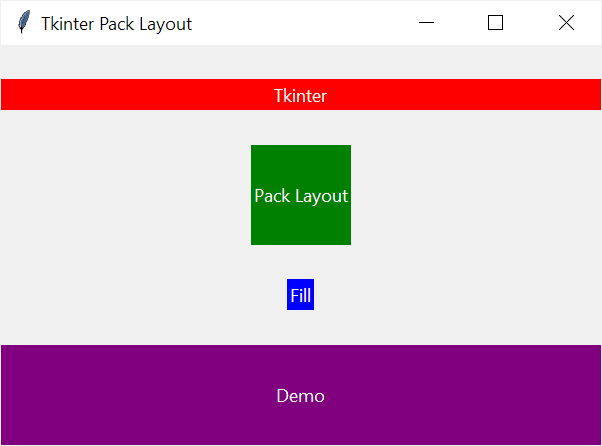
In this example, we arrange the Label widgets vertically from top to bottom and set the expand option for them to True.
- The first
Labelwidget has the fill value oftk.X, allowing it to fill extra spaces along the x-axis. - The second
Labelwidget has the fill value oftk.Y, allowing it to fill extra spaces along the y-axis. - The third
Labelwidget has the fill value oftk.NONE, indicating that it does not expand to fill any extra space. - The fourth
Labelwidget has the fill value oftk.BOTH, enabling it to occupy any additional space in both horizontal and vertical directions.
The following program shows how to use the fill option to force the Entry widget to take up all available spaces of the main window:
import tkinter as tk
from tkinter import ttk

root = tk.Tk()
root.title('Tkinter Pack Layout')
root.geometry('300x200')

name_label = ttk.Label(root, text="Name:")
name_label.pack(side=tk.LEFT)

name_entry = ttk.Entry(root)
name_entry.pack(side=tk.LEFT, expand=True, fill=tk.X)

button = ttk.Button(root, text="Submit")
button.pack(side=tk.LEFT)

root.mainloop()`Code language: JavaScript (javascript)
Output:
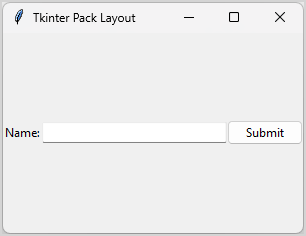
If you maximize the main window, the Entry widget will take up all horizontal spaces.
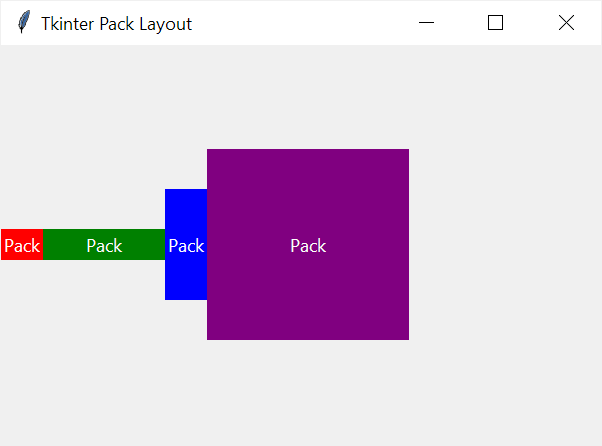
Internal paddings: ipadx & ipady
The ipadx and ipady parameters create internal paddings for widgets:
ipadxcreates padding left and right, or padding along the x-axis.ipadycreates padding top and bottom, or padding along the y-axis.
For example, the following program uses ipadx and ipady parameters to set the internal paddings of each Label widget:
import tkinter as tk

root = tk.Tk()
root.title('Tkinter Pack Layout')
root.geometry('600x400')

label1 = tk.Label(root, text='Pack',bg='red',fg='white')
label2 = tk.Label(root,text='Pack',bg='green', fg='white')
label3 = tk.Label(root, text='Pack',bg='blue', fg='white')
label4 = tk.Label(root, text='Pack',bg='purple', fg='white')

label1.pack(side=tk.LEFT)
label2.pack(side=tk.LEFT, ipadx=40)
label3.pack(side=tk.LEFT, ipady=40)
label4.pack(side=tk.LEFT, ipadx=80, ipady=80)

root.mainloop()`Code language: Python (python)
Output:
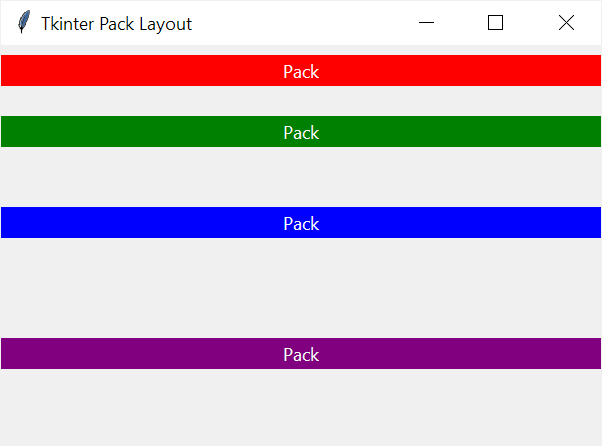
External paddings: padx and pady
The padx and pady parameters allow you to specify padding to be added horizontally and vertically, respectively:
padx– represents the horizontal padding that adds space to the left and right of the widget.pady– represents the vertical padding that adds space above or below the widget.
The following example illustrates how to use the pady:
import tkinter as tk

root = tk.Tk()
root.title('Tkinter Pack Layout')
root.geometry('600x400')

label1 = tk.Label(root, text='Pack',bg='red',fg='white')
label2 = tk.Label(root, text='Pack',bg='green', fg='white')
label3 = tk.Label(root, text='Pack',bg='blue', fg='white')
label4 = tk.Label(root, text='Pack',bg='purple', fg='white')

label1.pack(side=tk.TOP, fill=tk.X, pady=10)
label2.pack(side=tk.TOP, fill=tk.X, pady=20)
label3.pack(side=tk.TOP, fill=tk.X ,pady=40)
label4.pack(side=tk.TOP, fill=tk.X, pady=60)

root.mainloop()`Code language: JavaScript (javascript)
Output:
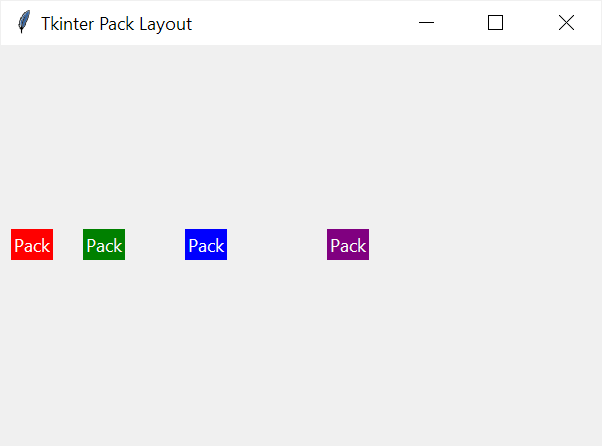
The following program illustrates how to use the padx:
import tkinter as tk

root = tk.Tk()
root.title('Tkinter Pack Layout')
root.geometry('600x400')

label1 = tk.Label(root, text='Pack',bg='red',fg='white')
label2 = tk.Label(root,text='Pack',bg='green', fg='white')
label3 = tk.Label(root, text='Pack',bg='blue', fg='white')
label4 = tk.Label(root, text='Pack',bg='purple', fg='white')

label1.pack(side=tk.LEFT, fill=tk.X, padx=10)
label2.pack(side=tk.LEFT, fill=tk.X, padx=20)
label3.pack(side=tk.LEFT, fill=tk.X ,padx=40)
label4.pack(side=tk.LEFT, fill=tk.X, padx=60)

root.mainloop()`Code language: JavaScript (javascript)
Output:
For example, you can use padx and pady to create horizontal and vertical paddings between widgets:
import tkinter as tk
from tkinter import ttk

root = tk.Tk()
root.title('Tkinter Pack Layout')
root.geometry('300x200')

name_label = ttk.Label(root, text="Name:")
name_label.pack(side=tk.LEFT, padx=5)

name_entry = ttk.Entry(root)
name_entry.pack(side=tk.LEFT, expand=True, fill=tk.X, padx=5)

button = ttk.Button(root, text="Submit")
button.pack(side=tk.LEFT, padx=5)

root.mainloop()`Code language: JavaScript (javascript)
Output:

In this example, we set the horizontal padding between the label, entry, and button widget using the padx option.
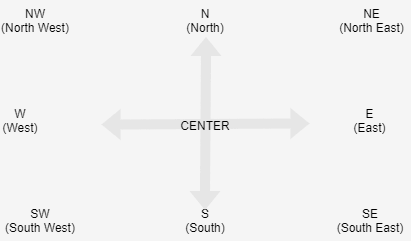
Anchor
The anchor parameter allows you to anchor the widget to the edge of the allocated space. It accepts one of the following values:
| Sticky | Description |
|---|---|
| ‘n’ | North or Top Center |
| ’s’ | South or Bottom Center |
| ‘e’ | East or Right Center |
| ‘w’ | West or Left Center |
| ‘nw’ | North West or Top Left |
| ‘ne’ | North East or Top Right |
| ‘se’ | South East or Bottom Right |
| ‘sw’ | South West or Bottom Left |
| ‘center’ | Center |
The following picture illustrates the anchor options:
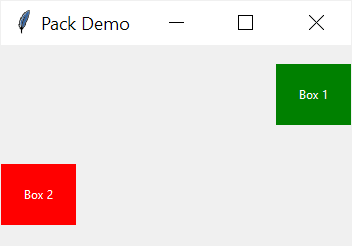
For example, the following program shows widgets that use E and W anchors:
import tkinter as tk

root = tk.Tk()
root.title('Pack Demo')
root.geometry("350x200")

# box 1
box1 = tk.Label(root, text="Box 1", bg="green", fg="white")
box1.pack(ipadx=20, ipady=20, anchor=tk.E,  expand=True)

# box 2
box2 = tk.Label(root, text="Box 2", bg="red", fg="white")
box2.pack(ipadx=20, ipady=20, anchor=tk.W, expand=True)

root.mainloop()`Code language: PHP (php)
Output:
Using Tkinter pack to create a login form
The following example uses the pack() method to create a login form:
import tkinter as tk
from tkinter import ttk

root = tk.Tk()
root.title('Login')
root.geometry("320x200")

fields = {}

fields['username_label'] = ttk.Label(root, text='Username:')
fields['username'] = ttk.Entry(root)

fields['password_label'] = ttk.Label(root, text='Password:')
fields['password'] = ttk.Entry(root, show="*")

for field in fields.values():
    field.pack(anchor=tk.W, padx=10, pady=5, fill=tk.X)

ttk.Button(text='Login').pack(anchor=tk.W, padx=10, pady=10)

root.mainloop()`Code language: JavaScript (javascript)
Output:
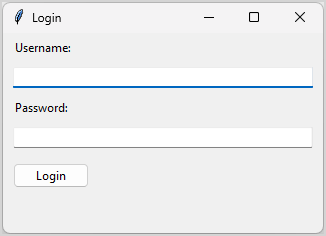
How it works.
First, initialize a dictionary to store the widgets:
fields = {}
Second, create Label and Entry widgets:
fields['username_label'] = ttk.Label(text='Username:')
fields['username'] = ttk.Entry()

fields['password_label'] = ttk.Label(text='Password:')
fields['password'] = ttk.Entry(show="*")`Code language: JavaScript (javascript)
Third, iterate through the widgets and pack them into the main window:
for field in fields.values():
    field.pack(anchor=tk.W, padx=10, pady=5, fill=tk.X)`
Finally, add the login button:
ttk.Button(text='Login').pack(anchor=tk.W, padx=10, pady=5)
Tkinter Grid
- Use the
columnconfigure()androwconfigure()methods to specify the weight of a column and a row of a grid. - Use
grid()method to position a widget on a grid. - Use
stickyoption to align the position of the widget on a cell and define how the widget will be stretched. - Use
ipadx,ipadyandpadx,padyto add internal and external paddings.
Summary: in this tutorial, you’ll learn how to use the Tkinter grid geometry manager to position widgets on a window.
Introduction to the Tkinter grid geometry manager
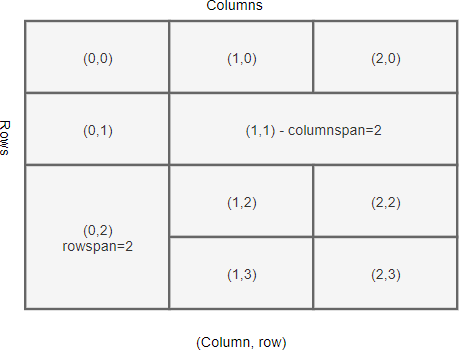
The grid geometry manager uses the concepts of rows and columns to arrange the widgets on a window or frame.
The following picture shows a grid that consists of four rows and three columns:
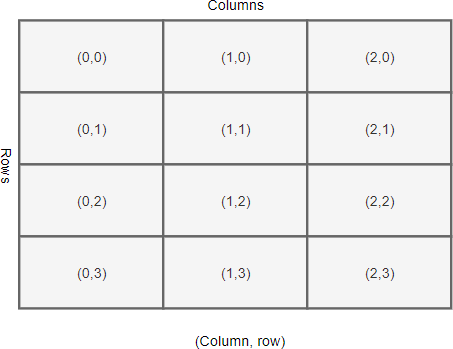
Each row and column in the grid is identified by an index. By default, the first row has an index of zero, the second row has an index of one, and so on. Likewise, the columns in the grid have indexes of zero, one, two, etc.
The indexes of rows and columns in a grid don’t have to start at zero. Additionally, indexes of the row and column can have gaps. For example, you can have a grid whose column indexes are 1, 2, 10, 11, and 12. The gaps can be useful when you plan to add more widgets in the middle of the grid later.
The intersection of a row and a column is called a cell. A cell is an area where you can place a widget. A cell can show only one widget at a time. If you place two or more widgets in a cell, they’ll be on top of each other.
To place multiple widgets in a cell, you use a container like a [Frame](https://www.pythontutorial.net/tkinter/tkinter-frame/) or [LabelFrame](https://www.pythontutorial.net/tkinter/tkinter-labelframe/) to wrap the widgets and place container on the cell.
The column’s width depends on the width of the widget it contains. Similarly, the row’s height depends on the height of the widgets contained within the row.
Rows and columns can span. The following picture shows a grid with the cell (1,1) that spans two columns and the cell (0,2) that spans two rows:
Setting up the grid
Before positioning widgets on a grid, you’ll need to configure the rows and columns of the grid. Tkinter provides you with two methods for configuring grid rows and columns:
container.columnconfigure(index, weight)
container.rowconfigure(index, weight)
Code language: CSS (css)
The columnconfigure() method configures the column index of a grid. The weight determines how wide the column will occupy, which is relative to other columns.
For example, a column with a weight of 2 will be twice as wide as a column with a weight of 1.
Positioning a widget on the grid
To place a widget on the grid, you use the widget’s grid() method:
widget.grid(**options)
The grid() method has the following parameters:
| Parameters | Meaning |
|---|---|
| column | The column index where you want to place the widget. |
| row | The row index where you want to place the widget. |
| rowspan | Set the number of adjacent rows that the widget can span. |
| columnspan | Set the number of adjacent columns that the widget can span. |
| sticky | If the cell is large than the widget, the sticky option specifies which side the widget should stick to and how to distribute any extra space within the cell that is not taken up by the widget at its original size. |
| padx | Add external padding above and below the widget. |
| pady | Add external padding to the left and right of the widget. |
| ipadx | Add internal padding inside the widget from the left and right sides. |
| ipady | Add internal padding inside the widget from the top and bottom sides. |
Sticky
By default, when a cell is larger than the widget it contains, the grid geometry manager places the widget at the center of the cell horizontally and vertically.
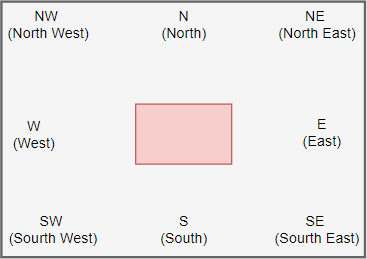
To change this default behavior, you can use the sticky option. The sticky option specifies which edge of the cell the widget should stick to.
The sticky has the following valid values:
| Sticky | Description |
|---|---|
| N | North or Top Center |
| S | South or Bottom Center |
| E | East or Right Center |
| W | West or Left Center |
| NW | North West or Top Left |
| NE | North East or Top Right |
| SE | South East or Bottom Right |
| SW | South West or Bottom Left |
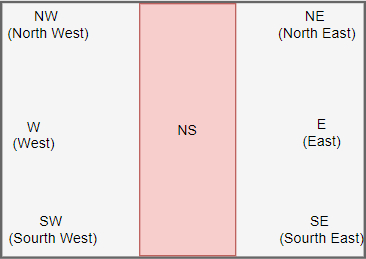
| NS | NS stretches the widget vertically. However, it leaves the widget centered horizontally. |
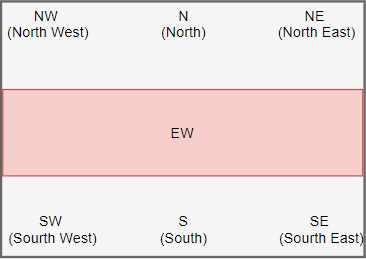
| EW | EW stretches the widget horizontally. However, it leaves the widget centered vertically. |
If you want to position the widget in the corner of the cell, you can use the N, S, E, and W.
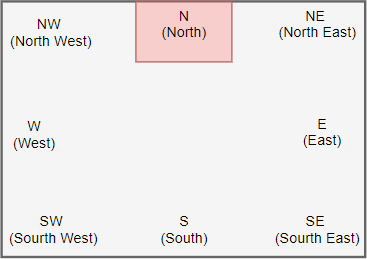
The following picture illustrates how to position a widget with the sticky option set to N:
If you want to position the widget centered against one side of the cell, you can use the NW (top left), NE (top right), SE (bottom right), and SW (bottom left).
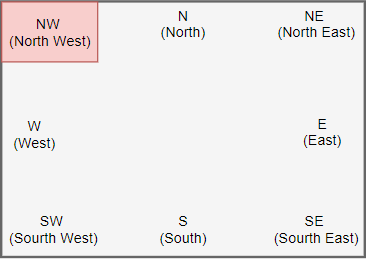
The following example shows how to position a widget with the sticky option set to NW:
NS stretches the widget vertically. However, it leaves the widget centered horizontally:
EW stretches the widget horizontally. However, it leaves the widget centered vertically:
Padding
To add paddings between cells of a grid, you use the padx and pady options. The padx and pady are external paddings:
grid(column, row, sticky, padx, pady)Code language: Python (python)
To add paddings within a widget itself, you use ipadx and ipady options. The ipadx and ipady are internal paddings:
grid(column, row, sticky, padx, pady, ipadx, ipady)Code language: Python (python)
The internal and external paddings default to zero.
Tkinter grid geometry manager example
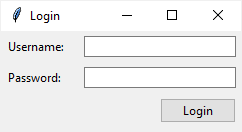
In this example, we’ll use the grid geometry manager to design a login screen as follows:
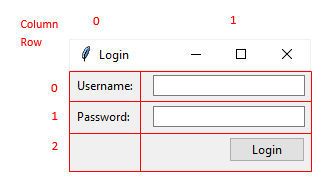
The login screen uses a grid that has two columns and three rows. Also, the second column is three times as wide as the first column:
The following shows the complete login window:
import tkinter as tk
from tkinter import ttk

# main window
root = tk.Tk()
root.geometry("240x100")
root.title('Login')

# grid 3x2
root.rowconfigure(0, weight=1)
root.rowconfigure(1, weight=1)
root.rowconfigure(2, weight=1)
root.columnconfigure(0, weight=1)
root.columnconfigure(1, weight=3)

# username
username_label = ttk.Label(root, text="Username:")
username_label.grid(column=0, row=0, sticky=tk.EW, padx=5, pady=5)

username_entry = ttk.Entry(root)
username_entry.grid(column=1, row=0, sticky=tk.EW, padx=5, pady=5)

# password
password_label = ttk.Label(root, text="Password:")
password_label.grid(column=0, row=1, sticky=tk.EW, padx=5, pady=5)

password_entry = ttk.Entry(root,  show="*")
password_entry.grid(column=1, row=1, sticky=tk.EW, padx=5, pady=5)

# login button
login_button = ttk.Button(root, text="Login")
login_button.grid(column=1, row=3, sticky=tk.E, padx=5, pady=5)

root.mainloop()
How it works.
First, use the rowconfigure() and columnconfigure() methods to set up a grid of 3 rows 2 columns:
root.rowconfigure(0, weight=1)
root.rowconfigure(1, weight=1)
root.rowconfigure(2, weight=1)
root.columnconfigure(0, weight=1)
root.columnconfigure(1, weight=3)
Second, position the username label on the first column and the username entry on the second column of the first row of the grid:
username_label = ttk.Label(root, text="Username:")
username_label.grid(column=0, row=0, sticky=tk.EW, padx=5, pady=5)

username_entry = ttk.Entry(root)
username_entry.grid(column=1, row=0, sticky=tk.EW, padx=5, pady=5)
Third, position the password label and entry on the first and second column of the second row:
password_label = ttk.Label(root, text="Password:")
password_label.grid(column=0, row=1, sticky=tk.EW, padx=5, pady=5)

password_entry = ttk.Entry(root,  show="*")
password_entry.grid(column=1, row=1, sticky=tk.EW, padx=5, pady=5)
Finally, position the login button on the third row. Since its sticky option sets to E, the button is aligned to the right of the third row.
login_button = ttk.Button(root, text="Login")
login_button.grid(column=1, row=3, sticky=tk.E, padx=5, pady=5)
Tkinter Place
Summary: The Tkinter place geometry manager to precisely position widgets within its container using the (x, y) coordinate system.
- Use the Tkinter
placegeometry manager to precisely position widgets within its container using the (x, y) coordinate system.
Introduction to Tkinter Place Geometry Manager
The Tkinter place geometry manager allows you to specify the exact placement of a widget using either absolution or relative positioning.
The placer geometry management gives you fine control over the positioning of widgets by allowing you to:
- Specify coordinates (x, y).
- Use relative positioning based on anchor points.
To use the place geometry manager, you call the place() method on the widget like this:
widget.place(**options)Code language: CSS (css)
Absolute positioning
In absolute positioning, you specify the exact x and y coordinates of the widget using the x and y parameters:
widget.place(x=50, y=50)

Relative positioning
In relative positioning, you place the widget using the relative coordinates using relx and rely parameters:

For example, the following place the widget in the center of its parent:
widget.place(relx=0.5, rely=0.5, anchor=CENTER)
Width and height
The place geometry manager allows you to set the width and height of the widget via the width and height paramaters:
widget.place(width=120, height=60)
Alternatively, you can use relative sizing concerning the parent container. For example, the following code sets the widget’s width and height to 50% of the parent’s dimensions:
widget.place(relwidth=0.5, relheight=0.5)
The relwidth and relheight has a value of a floating-point number between 0.0 and 1.0. This value represents a fraction of the width and height of the parent container.
Anchor
The anchor parameter determines which part of the widget is positioned at the given coordinates.
The anchor parameter accepts values such as:
'n','ne','e','se','sw','w','nw': These constants represent the cardinal and intercardinal directions (north, northeast, east, southeast, south, southwest, west, northwest).'center': This value instructs theplace()method to position the center of the widget at the specified coordinates.
The default value of the anchor is 'nw' which instructs the place() method to position the top left of the widget at the specified coordinates.
For example, the following code places the widget in the center of the container widget:
widget.place(relx=0.5, rely=0.5, anchor='center')
Tkinter place geometry manager examples
Let’s take some examples of using the Tkinter place geometry manager.
Absolute positioning example
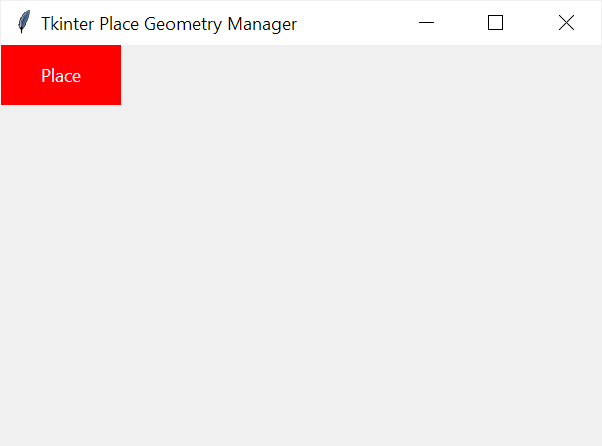
The following example uses the place geometry manager to place a label at (0,0) with a width of 60 and height of 120:
import tkinter as tk

root = tk.Tk()
root.title('Tkinter Place Geometry Manager')
root.geometry("600x400")

label1 = tk.Label(master=root, text="Place",bg='red',fg='white')
label1.place(x=0,y=0,width=120, height=60)

root.mainloop()`Code language: JavaScript (javascript)
Output:
Relative positioning example
The following program places a Label widget with its top-left corner at the center of the window:
import tkinter as tk

root = tk.Tk()
root.title('Tkinter Place Geometry Manager')
root.geometry("600x400")

label1 = tk.Label(master=root, text="Place",bg='red',fg='white')
label1.place(relx=0.5, rely=0.5, width=100, height=50)

root.mainloop()` Code language: JavaScript (javascript)
Output:
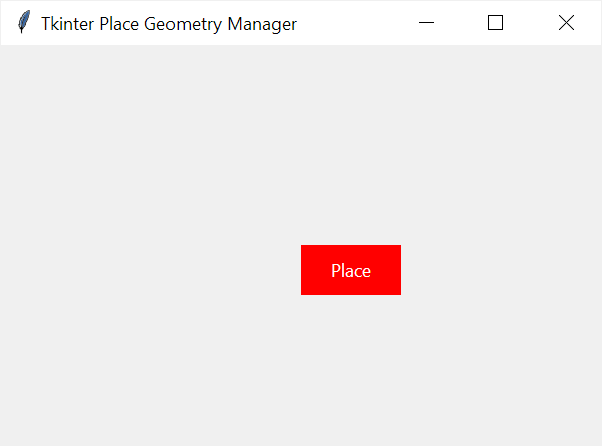
Using the anchor point
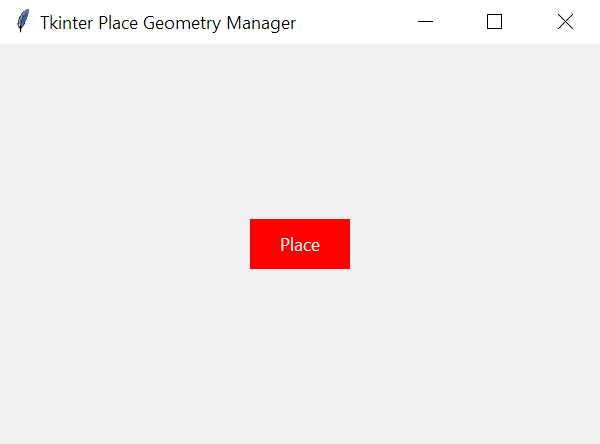
The following example places the center point of the Label widget at the center of the window:
import tkinter as tk

root = tk.Tk()
root.title('Tkinter Place Geometry Manager')
root.geometry("600x400")

label1 = tk.Label(master=root, text="Place",bg='red',fg='white')
label1.place(relx=0.5, rely=0.5, width=100, height=50, anchor=tk.CENTER)

root.mainloop()` Code language: JavaScript (javascript)
Output: